為何回頭看 1960 年代的模型#
本章從評估耦合的第一個正式模型開始:**結構化設計(structured design)**所提出的 module coupling。Larry Constantine 早在 1963 年就開始發展這套方法,1970 年代才與 Edward Yourdon 合著公開。
為什麼要學半世紀前的模型?因為它與 Chapter 6 的 connascence 都是 Chapter 7「Integration Strength」的基礎。我們不是在學歷史,而是在學貫穿至今的設計原理。
Module Coupling 的六個層級#
結構化設計把模組耦合分成六個層級(由強到弱):
- Content coupling(內容耦合)
- Common coupling(共用耦合)
- External coupling(外部耦合)
- Control coupling(控制耦合)
- Stamp coupling(戳記耦合)
- Data coupling(資料耦合)
「模組」不是某種特定邊界——它是責任分配。所以這個模型適用於 method、function、class、namespace、service、甚至整個系統之間的耦合。
Content Coupling(內容耦合)#
又名 pathological coupling(病態耦合)。下游模組直接觸及上游模組的內部,繞過公開介面。
經典範例:跳到內部標籤#
組合語言中:
01    ROUTINE MAIN
12      JUMP TO COMP + 18    ; 直接跳到 PROCESS 內部 COMP 之後第 18 行
20    END ROUTINE MAIN
21    ROUTINE PROCESS
35      COMP:
53        MOVE 0 TO REGISTER B
72 END ROUTINE PROCESS現代等價物#
- 用反射(reflection)呼叫私有方法
- 微服務直接讀取另一個微服務的資料庫,繞過其 API
Content coupling 等於把上游模組的邊界整個踩塌。整合方式既隱晦又脆弱:
- 上游無法演進實作
- 上游甚至不知道有人在依賴它的內部
- 上游的小修改可能引發系統其他部分的莫名故障
Common Coupling(共用耦合)#
兩個模組透過全域共享資料結構互相讀寫。名稱來自 Fortran 的 COMMON 陳述式:
01    SUBROUTINE SUB1 ()
06        COMMON /VARS/ ALPHA, BETA, GAMMA, DELTA
10    END

11    SUBROUTINE SUB2 ()
16        COMMON /VARS/ ALPHA, BETA, GAMMA, DELTA
20    END
即使某個 subroutine 只想動其中一個變數,也得宣告整個區塊;任何變動都會影響所有 common-coupled 的 subroutine。
現代等價物#
- 多個模組讀寫同一個 S3 / GCS / Azure Storage 上的檔案
- 同一個 class 中多個方法共用 member 變數(程度較輕,但本質仍是 common coupling)
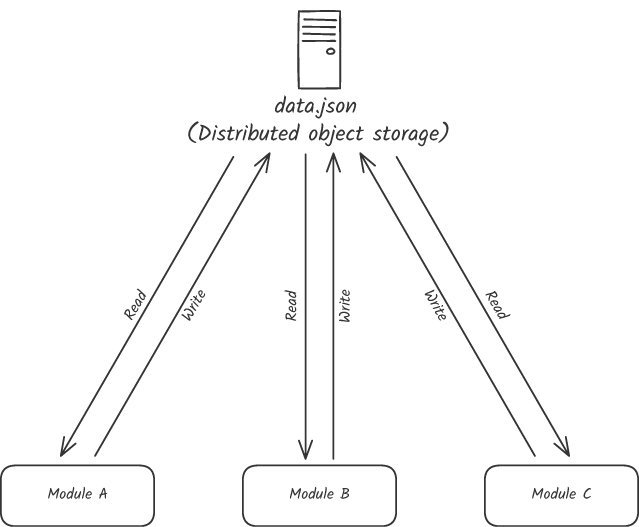
Figure 5.1: 透過全域物件儲存的共享檔案進行 common coupling
為何排在第二強#
- 共享過量資訊:一處改動需要與所有共用模組協調
- 隱性整合契約:難以追蹤每個模組實際用了哪部分資料
- 資料流難以追蹤:寫入造成的副作用蔓延,但讀取者無法溯源
- 業務邏輯重複:驗證規則必須在每個寫入端重複,否則容易進入無效狀態
- 並發風險:多模組同時改動需要序列化機制,可能拖垮效能甚至無法實作
Content vs Common 的差異在「意圖」:
- Content:偷偷越界,上游不知情
- Common:所有模組都「同意」用共享記憶體整合(明示的合作)
External Coupling(外部耦合)#
仍透過全域資料整合,但只暴露整合所需的那部分。名稱來自 PL/I 的 EXTERNAL 屬性:
01    ProcA: procedure;
02        declare A fixed decimal (7,2) external;
10    end ProcA;

11    ProcB: procedure;
12        declare A fixed decimal (7,2) external;
20 end ProcB;現代等價物#
class ClassA {
    companion object {
        var Name: String = ""
    }
}

class ClassB {
    fun setName(name: String) {
        ClassA.Name = name
    }
}

class ClassC {
    fun greet() {
        println("Hello, ${ClassA.Name}")
    }
}
比 common coupling 暴露的資料少了,但本質上仍是「全域狀態」——副作用追蹤、業務邏輯重複、並發處理等問題都還在。
Control Coupling(控制耦合)#
上游模組的執行流程被下游用旗標、命令、選項控制。呼叫端不只說「做什麼」,還告訴對方「怎麼做」。
fun sendNotification(type: String, message: String) {
    when (type) {
        "sms" -> sendSMS(message)
        "email" -> sendEmail(message)
        "push" -> sendPushNotification(message)
        else -> throw Error("Notification type not supported")
    }
}

fun notifyUser(user: User, message: String) {
    val type = when {
        user.preferences.receiveSMS && user.phone != null -> "sms"
        user.preferences.receiveEmail -> "email"
        user.preferences.receivePush -> "push"
        else -> throw Error("No suitable notification")
    }
    sendNotification(type, message)
}
控制耦合洩漏了上游模組的「內部結構知識」。一旦上游不再支援
push,所有呼叫端都得修改,否則 runtime 會炸。用 enum 取代字串能降低錯誤率,但底層的設計問題沒變:上游沒有把該封裝的執行流程封裝起來。
Stamp Coupling(戳記耦合)#
模組之間透過傳遞包含過量欄位的資料結構整合:
namespace Example.CRM {
    class CustomersRepository {
        fun get(id: UUID): Customer { /* ... */ }
    }
}

namespace Example.Analysis {
    class Assessment {
        fun execute(customerId: UUID) {
            val repository = CustomersRepository()
            val status = repository.get(customerId).status   // 只想要 status,卻拿了整個 Customer
        }
    }
}
上游模組無法自由演進這個資料結構——它必須假設「公開的所有欄位都可能被某個下游用到」。
Stamp vs Common#
兩者都共享了用不到的資料,但 stamp coupling 是透過方法呼叫傳值、由原始模組獨自掌握資料;不需要並發控制,也不會逼出業務邏輯重複。
Stamp vs Control#
- Control:洩漏的是行為知識
- Stamp:洩漏的是資料結構知識
行為比資料結構更不穩定,因此 stamp 比 control 弱。
Data Coupling(資料耦合)#
最弱的耦合。模組只共享整合所需的最小資料:
namespace Example.CRM {
    class CustomersRepository {
        fun getStatus(customerId: UUID): Status { /* ... */ }
    }
}

namespace Example.Analysis {
    class Assessment {
        fun execute(customerId: UUID) {
            val repository = CustomersRepository()
            val status = repository.getStatus(customerId)
        }
    }
}
更極致的做法是引入專用的 DTO(Data Transfer Object):
namespace Example.CRM.Integration.DTOs {
    class CustomerSnapshot {
        companion object {
            fun from(customer: Customer): CustomerSnapshot { /* ... */ }
        }
    }
}

namespace Example.CRM {
    class CustomersRepository {
        fun get(customerId: UUID): CustomerSnapshot { /* ... */ }
    }
}
DTO 把內部設計與整合介面解耦:內部結構可以隨意演化,介面保持穩定,下游受到的影響降到最低。
六個層級的對照#
由強到弱:
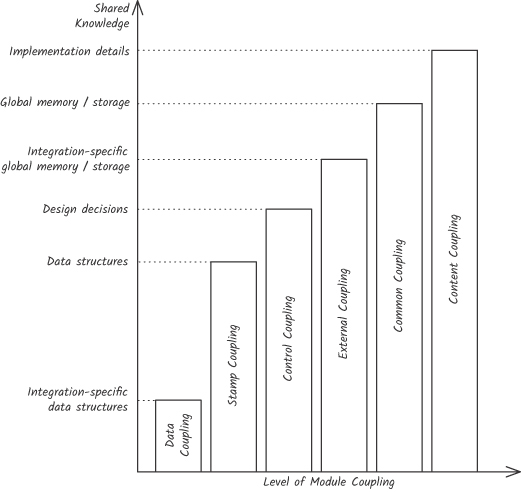
Figure 5.2: 結構化設計六個模組耦合層級的對照
| 層級 | 整合介面 | 共享的知識 |
|---|---|---|
| Content | 隱式、無文件、繞過邊界 | 完整實作細節 |
| Common | 全域可寫狀態 | 業務邏輯 + 完整資料結構 |
| External | 全域可寫狀態(限縮範圍) | 業務邏輯 + 必要資料結構 |
| Control | 顯式參數 | 上游內部執行流程 |
| Stamp | 顯式參數 | 過量的資料結構欄位 |
| Data | 顯式參數 | 僅整合所需的最小資料 |
重點整理#
在程式碼中辨認這些耦合層級時,可以這樣自問:
- 是否有元件共用同一個資料庫?它們需要知道哪些事情才能維持資料一致?(External / Common)
- 是否有介面在傳遞含有過量資訊的資料結構?(Stamp vs Data)
- 是否有元件依賴對方的實作細節來整合?(Content)
此時還不是判斷「哪一級該被避免」的時候——那是 Part III 的工作。先學會辨識耦合在程式碼中以何種形式出現。
下一章將從另一個角度切入耦合——Connascence(共生),它與 module coupling 的視角互補,最終會在 Chapter 7 整合成 Integration Strength。