用 Wireshark 分析 HTTP 這類已知協定很輕鬆,因為軟體本身就能抽出所有必要資訊。自訂協定就麻煩得多:所有相關資訊都得自己從網路流量的位元組表示中手動抽出。
好在 Wireshark 提供 Protocol Dissectors(協定解析器) 外掛機制,讓你替它加上額外的協定分析能力。過去這需要用 C 寫一個對應特定 Wireshark 版本的解析器,但現代版本的 Wireshark 支援 Lua 腳本語言。用 Lua 寫的腳本同樣能在命令列工具 tshark 上運作。
Lua 語言細節與 Wireshark API 超出本書範圍。Lua 官方文件在
https://www.lua.org/docs.html,Wireshark 網站(尤其是 Wiki:https://wiki.wireshark.org/Lua/)則是各種教學與範例程式碼最好的去處。
開發前的準備#
確認 Wireshark 支援 Lua:從 Help ▸ About Wireshark 開啟對話框,看到 Lua 字樣就代表可以用。
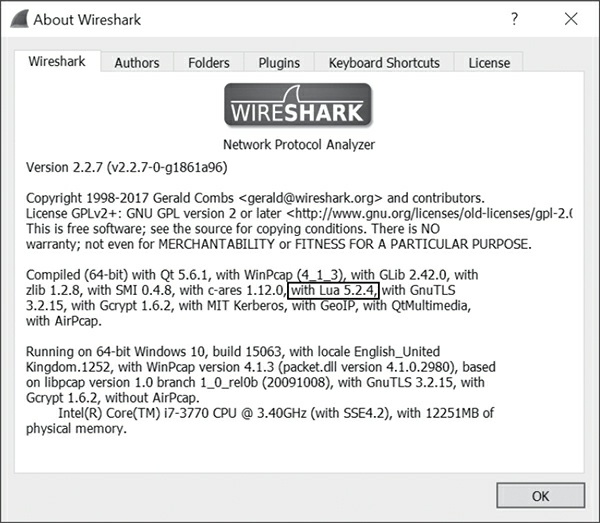
圖表 5-10:顯示支援 Lua 的 Wireshark About 對話框
在類 Unix 系統上,若以 root 執行 Wireshark,Wireshark 通常會基於安全考量停用 Lua 支援。你必須設定成以非特權使用者執行,才能一邊擷取一邊跑 Lua 腳本。請查閱你作業系統的 Wireshark 文件,了解安全的做法。
選擇 UDP 而非 TCP 當練習對象。你幾乎可以替 Wireshark 擷取得到的任何協定寫解析器,包括 TCP 與 UDP,但 UDP 容易得多:每個擷取到的 UDP 封包通常已包含解析器所需的一切。TCP 則要處理資料跨越多個封包這類問題——這正是先前 Python 腳本必須處理長度欄位的原因。
方便的是,SuperFunkyChat 本身支援 UDP 模式,啟動用戶端時加上 --udp 參數即可。開著擷取送出這個旗標,就會看到對應的 UDP 封包。
在還沒有自訂解析器時,Wireshark 會在 Protocol 欄位把這些流量錯認成毫不相干的 GVSP 協定。實作自己的解析器就會修正這個誤判。
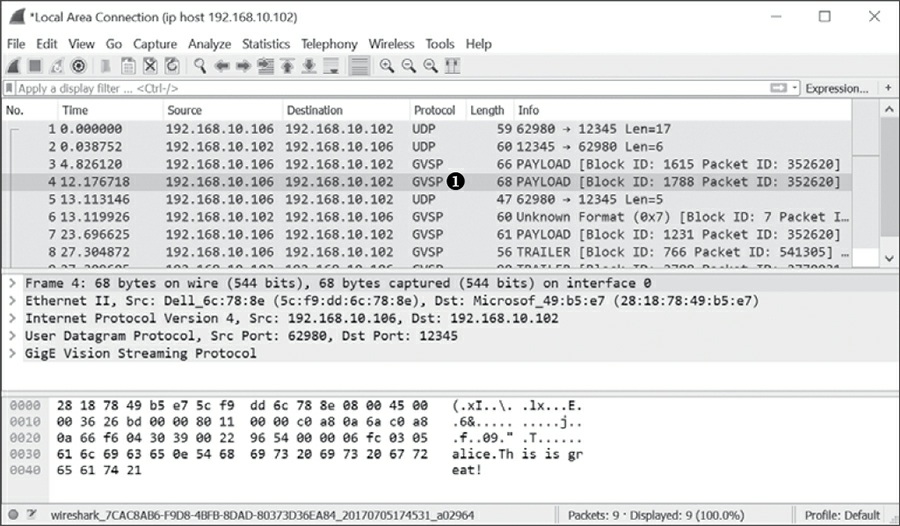
圖表 5-11:Wireshark 顯示擷取到的 UDP 流量
載入 Lua 腳本有兩種方式:
- 把腳本放進外掛目錄:Windows 是
%APPDATA%\Wireshark\plugins,Linux 與 macOS 是~/.config/wireshark/plugins。 - 在命令列指定:
wireshark -X lua_script:</path/to/script.lua>若腳本語法有誤,Wireshark 會跳出錯誤訊息對話框。這稱不上是高效率的開發流程,但在做原型時夠用了。
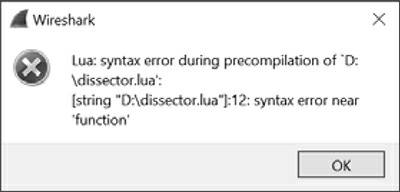
圖表 5-12:Wireshark 的 Lua 錯誤對話框
建立解析器骨架#
第一步是建立解析器的基本外殼,並把它註冊到 Wireshark 的 UDP 連接埠 12345 解析器清單中。
-- Declare our chat protocol for dissection
chat_proto = Proto("chat","SuperFunkyChat Protocol")

-- Specify protocol fields
chat_proto.fields.chksum = ProtoField.uint32("chat.chksum", "Checksum",
                                             base.HEX)
chat_proto.fields.command = ProtoField.uint8("chat.command", "Command")
chat_proto.fields.data = ProtoField.bytes("chat.data", "Data")

-- Dissector function
-- buffer: The UDP packet data as a "Testy Virtual Buffer"
-- pinfo: Packet information
-- tree: Root of the UI tree
function chat_proto.dissector(buffer, pinfo, tree)
    -- Set the name in the protocol column in the UI
    pinfo.cols.protocol = "CHAT"

    -- Create sub tree which represents the entire buffer.
    local subtree = tree:add(chat_proto, buffer(),
                             "SuperFunkyChat Protocol Data")
    subtree:add(chat_proto.fields.chksum, buffer(0, 4))
    subtree:add(chat_proto.fields.command, buffer(4, 1))
    subtree:add(chat_proto.fields.data, buffer(5))
end

-- Get UDP dissector table and add for port 12345
udp_table = DissectorTable.get("udp.port")
udp_table:add(12345, chat_proto)
把它存成 dissector.lua,連同一份 UDP 流量擷取檔載入 Wireshark,應該不會出現任何錯誤。這段腳本的重點:
- 腳本載入時建立一個
Proto類別的實例,代表一個 Wireshark 協定,命名為chat_proto。 - 雖然可以手動組出解析樹,這裡選擇明確定義協定欄位。這麼做的好處是欄位會被加入顯示過濾器引擎,於是你可以設定
chat.command == 0這種顯示過濾器,讓 Wireshark 只顯示指令 0 的封包。 chat_proto.dissector()函式會在解析封包時被呼叫,接收三個參數:buffer:包含封包資料的緩衝區,是 Wireshark 所謂的 Testy Virtual Buffer(TVB) 的實例。pinfo:封包資訊實例,代表這次解析的顯示資訊。tree:UI 的根樹狀物件,你可以掛上子節點來產生封包資料的顯示。
- 把 UI 欄位中的協定名稱設為
CHAT,然後建立協定元素的樹。由於 UDP 沒有明確的長度欄位,我們不必處理長度,只要抽出校驗和即可。用buffer參數建立 range(傳入起始索引與可選的長度;不指定長度就是用到緩衝區結尾)。 - 最後取得 UDP 解析器表,把
chat_proto物件以連接埠 12345 加進去。注意此時dissector()函式尚未執行,我們只是定義了它。
「把欄位定義成
ProtoField而不是純文字節點」是很值得養成的習慣。因為欄位可被過濾,分析時就能輕鬆篩出特定封包單獨檢視,這對梳理複雜協定的幫助非常大。
解析結果#
以 -X 參數啟動 Wireshark 載入這支腳本,再載入 UDP 流量擷取檔,就會看到解析器生效:
- Protocol 欄位變成 CHAT,對應解析器函式第一行的設定,一眼就能確認自己看的是正確的協定。
- 樹狀結果列出協定各欄位,校驗和依我們指定的方式以十六進位顯示。
- 點選樹中的 Data 欄位時,視窗底部的原始封包顯示會標示出對應的位元組範圍。
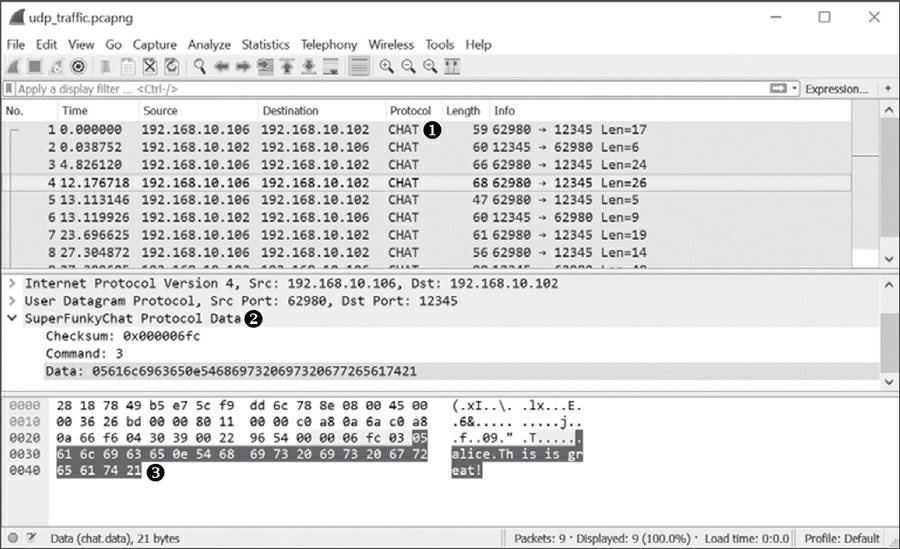
圖表 5-13:解析後的 SuperFunkyChat 協定流量
解析 Message 封包#
接著擴充解析器,讓它剖析特定封包。這裡用指令 3當例子,因為我們已經確定它代表訊息的送出或接收。收到的訊息應該同時含有寄件者 ID 與訊息文字,兩個成分都在,非常適合示範。
先前 Python 腳本傾印出的訊息資料長這樣:
b'\x03bob\x0cHow are you?'
b"\x03bob\x16This is nice isn't it?"
\xXX 是不可列印位元組,\x03 就是位元組 0x03,\x16 就是 0x16(十進位 22)。每個封包中有兩個可列印字串:第一個是使用者名稱(此處是 bob),第二個是訊息本身,而每個字串前面都有一個不可列印字元。做最簡單的分析(數字元數量)就會發現:那個不可列印字元就是後續字串的長度——使用者名稱前的字元是 0x03,而 bob 正好三個字元。
於是我們寫一個函式來剖析單一二進位字串,並把 Message 指令加進解析樹。
dissector_with_commands.lua:加入 Message 指令剖析的完整解析器
-- Declare our chat protocol for dissection
chat_proto = Proto("chat","SuperFunkyChat Protocol")

-- Specify protocol fields
chat_proto.fields.chksum = ProtoField.uint32("chat.chksum", "Checksum",
                                             base.HEX)
chat_proto.fields.command = ProtoField.uint8("chat.command", "Command")
chat_proto.fields.data = ProtoField.bytes("chat.data", "Data")

-- buffer: A TVB containing packet data
-- start: The offset in the TVB to read the string from
-- returns The string and the total length used
function read_string(buffer, start)
    local len = buffer(start, 1):uint()
    local str = buffer(start + 1, len):string()
    return str, (1 + len)
end

-- Dissector function
-- buffer: The UDP packet data as a "Testy Virtual Buffer"
-- pinfo: Packet information
-- tree: Root of the UI tree
function chat_proto.dissector(buffer, pinfo, tree)
    -- Set the name in the protocol column in the UI
    pinfo.cols.protocol = "CHAT"

    -- Create sub tree which represents the entire buffer.
    local subtree = tree:add(chat_proto,
                             buffer(),
                             "SuperFunkyChat Protocol Data")
    subtree:add(chat_proto.fields.chksum, buffer(0, 4))
    subtree:add(chat_proto.fields.command, buffer(4, 1))

    -- Get a TVB for the data component of the packet.
    local data = buffer(5):tvb()
    local datatree = subtree:add(chat_proto.fields.data, data())

    local MESSAGE_CMD = 3
    local command = buffer(4, 1):uint()
    if command == MESSAGE_CMD then
        local curr_ofs = 0
        local str, len = read_string(data, curr_ofs)
        datatree:add(chat_proto, data(curr_ofs, len), "Username: " .. str)
        curr_ofs = curr_ofs + len
        str, len = read_string(data, curr_ofs)
        datatree:add(chat_proto, data(curr_ofs, len), "Message: " .. str)
    end
end

-- Get UDP dissector table and add for port 12345
udp_table = DissectorTable.get("udp.port")
udp_table:add(12345, chat_proto)
新增的 read_string() 函式接收一個 TVB 物件(buffer)與起始位移(start),回傳字串以及所用的總長度。主流程則是:
- 先加入原本的 data 樹,並建立一個只包含封包資料部分的新 TVB 物件。
- 把 command 欄位取成整數,檢查是否為 Message 指令。若不是,就維持既有的 data 樹不動。
- 若相符,就剖析出兩個字串並加進 data 子樹。這裡不定義專屬欄位,而是只指定 proto 物件、不指定 field 物件,藉此加入純文字節點。
重新載入檔案後,使用者名稱與訊息字串就會被剖析出來顯示在樹中。由於剖析出的資料成為可過濾的值,你可以用顯示過濾器 chat.command == 3 只挑出 Message 指令來看。
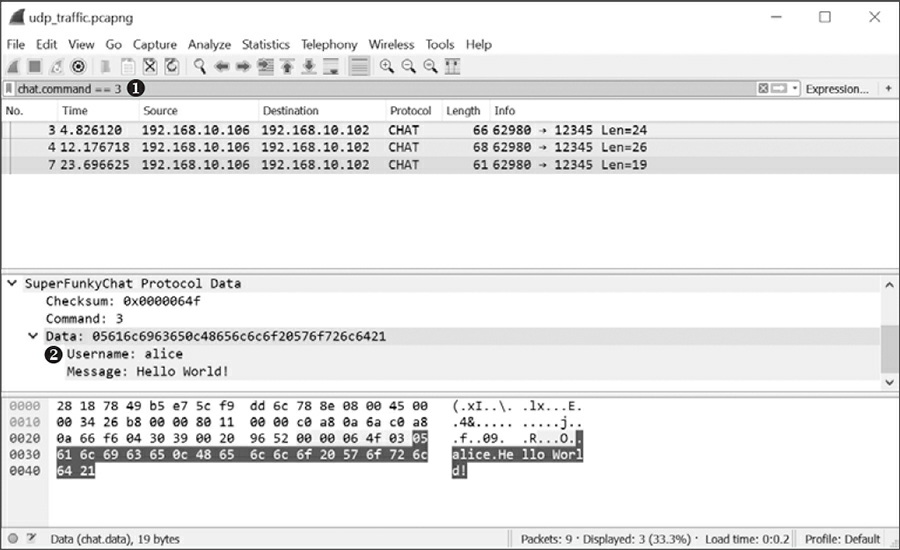
圖表 5-14:剖析後的 Message 指令
如果字串長度超過一個位元組能表示的範圍怎麼辦?這正是協定分析的難處之一:看起來簡單的東西不代表它真的簡單。這裡刻意忽略長度問題,因為這只是示範,而且對我們擷取到的所有樣本都成立——但真實協定不見得會這麼客氣。
這只是撰寫 Lua 解析器的快速入門。這支腳本還有很多能做的事,例如支援更多指令;若要處理 TCP,還需要實作串流剖析器(stream parser)。這些主題請參考 Wireshark 官網。用 Lua 做 Wireshark 分析工具的原型是非常理想的選擇。